

"Passwordless" signups and logins are fast becoming a thing these days. The fact that users don't want to go through the stress of remembering which password or email they've used in creating accounts on websites is just awesome.
Now signing up with social media accounts like Google, Facebook, Twitter, etc. takes care of that and everyone is happy.
In this two-part tutorial, we are going to Implement an OAuth process on the backend using Google OAuth and Passport.js and it will run locally on a node and express sever.
But first, what is OAuth?
OAuth stands for Open Authorization, this simply means allowing third party services exchange information about a user without giving away such a user's password.
Remember those times when you try signing up on a website for the first time, and you click the button that says "Signup with Google"; then a page pops up asking for your permission to get some information about you from your google account, then you click on your email. What you've done in such a scenario is initiating a simple OAuth Process. It's just like saying
"Hey Google, I'm trying to register on this new website, Can you please provide some information about me like my name and email to this website since you happen to have such information".
So, the website gets this information from Google and proceed to create an account for you with such information without you providing a password on sign up, this will allow the use of the same information during login.
How does Passport comes into the picture?
PassportJS will help us with a large chunk of the OAuth process. When the user clicks ‘Login,’ Passport kicks in and forwards the request to in our case Google. Google prompts the user for permission and then kicks back a code (in the form of a query string) to our server. Our server then uses that code to request certain information about the user from Google.
The OAuth Flow
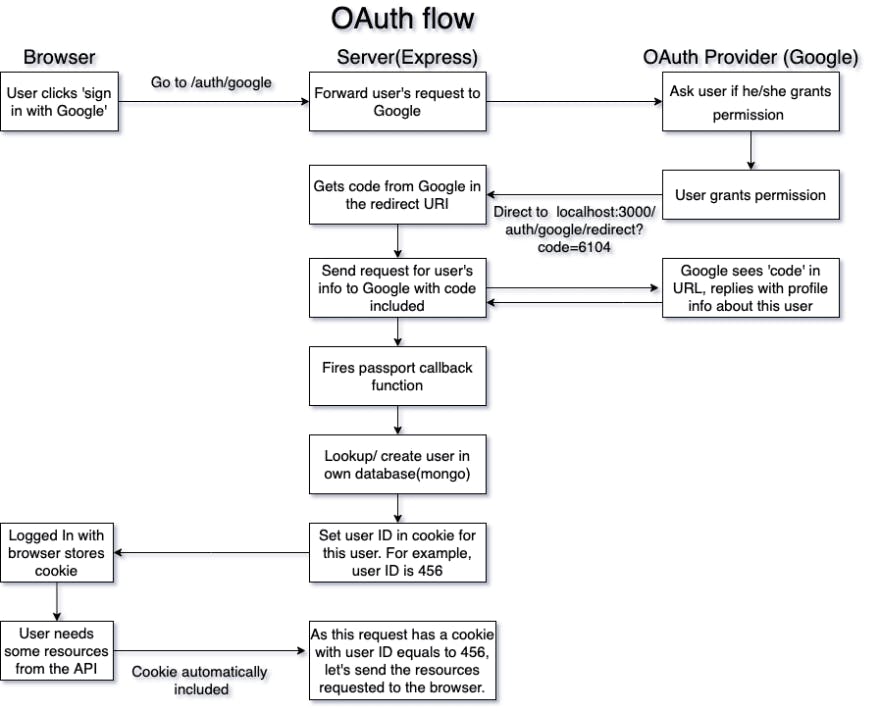
The chart above gives a clear picture of the steps involved during the OAuth flow process.
Setting up the Authentication flow
This section assumes that you have a basic understanding of JavaScript and little understanding of NodeJS
Let's dive in,
- Step 1: Create a directory for your project
I am currently on windows, and I use git bash as my Vscode integrated terminal. I'd assume you do because it allows me to run some basic Linux commands on windows. If you do not have it installed, you can download here and follow the installation procedure to set it up on your computer.
Copy and paste the code below on your terminal
mkdir google-oauth && cd google-oauth
npm init -y
code .
This will create a directory for your project, migrate into the directory, create a package.json file for your project and lastly open your default code editor
- Step 2: Installing Express, MongoDB and other dependencies Copy and paste the code below in your terminal and press enter
npm install --save express mongoose passport passport-google-oauth20
Incase you use yarn, copy the code below
yarn add express mongoose passport passport-google-oauth20
Then we need to install nodemon so we don't have to keep restarting our server every time we save changes made to our code
npm install nodemon --save-dev
or
yarn add -D nodemon
This will install nodemon as a dev dependency. Next step is editing the package.json file in order to be able to use the nodemon change the script section of the file by pasting the code snippet below
...,
  "scripts": {
    "start": "node index",
    "dev": "nodemon index"
  },
...
- Step 3: Creating the server
create an
index.jsfile in the root of your folder and paste in the following code
// import express
const express = require('express');

// create new express app and save it as "app"
const app = express();

// server configuration

const PORT = 3000;

// create a route for the app
app.get('/', (req, res) => {
  res.send('Hello World');
});

// make the server listen to requests
app.listen(PORT, () => {
  console.log(`Server running on: http://localhost:${PORT}/`);
});
Then run npm run dev or yarn dev in your terminal, by this time you should see the on the terminal saying Server is running on : http://localhost:3000/. If you visit http://localhost:3000/ in your browser you get "Hello world"
Congratulations you have successfully created a server that is running on your machine.
Getting API Key and Registering URI Settings on google
To get the App's API key and set up redirect URI'S follow the following steps
- Go to Google Developer Console
- Click on the down facing caret located at the top left corner of the page
- A modal pops in, click on create a new project on the modal
- Fill in your desired project name then save your entries
- On the side navigation bar, click credentials then the Plus sign saying Create Credentials
- Click OAuth Client ID
- Select Application type of web application
- Click Add URI and Authorize redirect URI and fill in
http://localhost:3000andhttp://localhost:3000/auth/google/redirectrespectively (These will come handy later). - Copy the Client Secret Key and Client ID somewhere as we will be needing it going forward
Why do we need to set URI
When the user signs in through the Google consent screen, Google needs to send the user’s profile back to a specific endpoint. Of course, this needs to be our endpoint, lest some hacker tries to make Google OAuth send the user information to some malicious destination. So, we’ll set our endpoint, which Google then will store on its servers. Every time a user goes through the Google OAuth flow, it’ll check that the callback URL is the same as the redirect URI.
I'd love to stop here for now so as not to bug you with too much information.
In the next tutorial we shall be Covering the following
Connecting our App to MongoDB, and creating schema with mongoose
Implement passport, for signup, login, and logout
That's it for now, see you at the concluding part of this series. But before then, Please like, comment, and share this post.
And don't forget to always wash your hands, practice social distancing and stay safe.
Reference: